Artificial hedges offer a convenient and attractive way to add greenery to your space without the hassle of maintenance. Whether you’re looking to enhance your outdoor area or create a stunning vertical garden indoors, installing artificial hedges is a simple process that can transform your space. In this step-by-step guide, we’ll walk you through the installation process, ensuring a seamless and visually appealing result. Follow these steps to enjoy a lush and vibrant vertical garden that requires minimal upkeep.
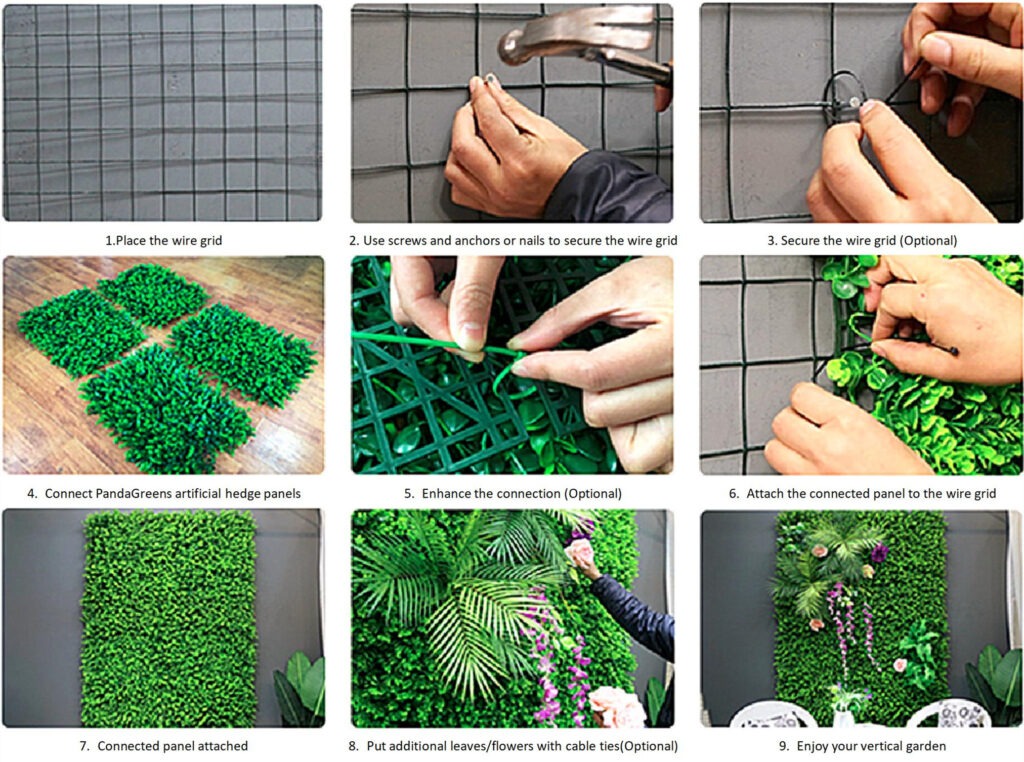
- Place the wire grid:
Begin by preparing the installation area. Clear any debris and ensure the surface is clean and smooth. Position the wire grid onto the desired surface where you want to install the artificial hedges. The wire grid will serve as the base for attaching the panels securely. - Use screws and anchors or nails to secure the wire grid:
To ensure stability and long-lasting installation, use screws, anchors, or nails to firmly attach the wire grid to the surface. Make sure to choose appropriate fasteners that are suitable for the type of surface you are working with. - Secure the wire grid (Optional):
For added security, consider reinforcing the wire grid by attaching it more securely using additional screws or fasteners. This step is optional but can provide extra stability, especially for larger installations or areas exposed to strong winds. - Connect PandaGreens artificial hedge panels:
PandaGreens artificial hedge panels are designed with interlocking snaps for easy and secure connection. Piece together the panels by aligning the interlocking snaps and securely snapping them together. Ensure that all the panels fit snugly and form a seamless hedge surface. - Enhance the connection (Optional):
To reinforce the connections between the panels and create a more durable installation, consider enhancing the connection. You can use additional fasteners, such as zip ties or wire clips, to strengthen the bond between the panels. This step is optional but recommended for installations in high-traffic areas or where extra stability is desired. - Attach the connected panels to the wire grid:
With the artificial hedge panels securely connected, it’s time to attach them to the wire grid. Use cable ties or fasteners to firmly secure the connected panels onto the wire grid. Ensure that each panel is properly aligned and securely fastened to prevent any movement or loosening. - Ensure all panels are properly attached:
Double-check that all the panels are securely attached to the wire grid and there are no loose connections. Make any necessary adjustments to ensure a tight and uniform appearance. - Put additional leaves/flowers with cable ties (Optional):
For a more personalized touch, you can add extra artificial leaves or flowers to the panels. Use cable ties or clips to attach the additional foliage, creating a customized and visually appealing display. This step is optional and allows you to further enhance the aesthetics of your artificial hedges. - Enjoy your vertical garden:
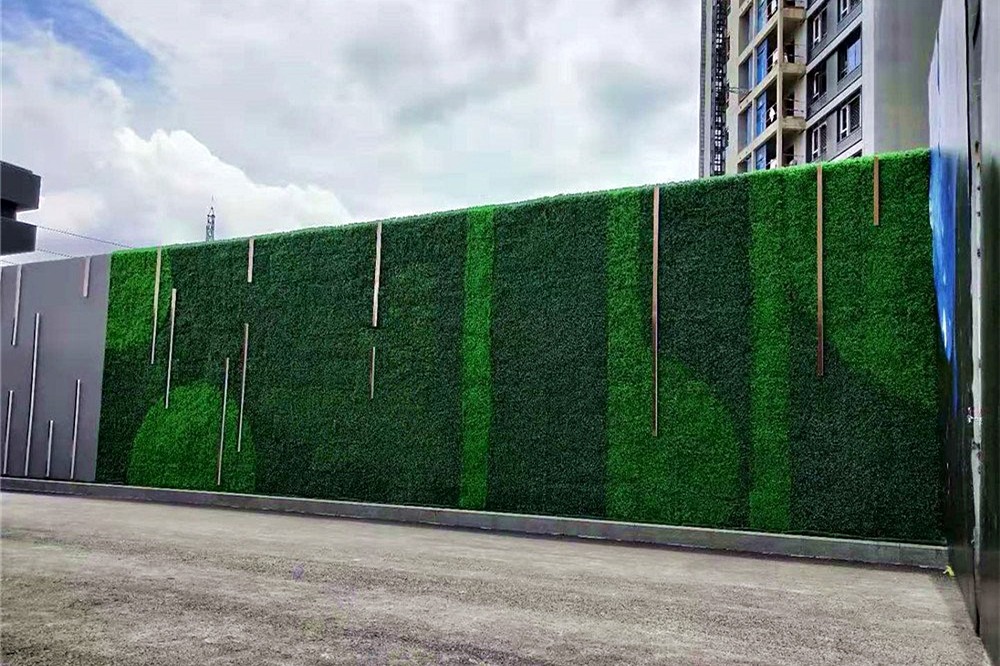
Step back and admire your newly installed artificial hedges. Take pleasure in the beauty of your lush and vibrant vertical garden that requires minimal maintenance. With artificial hedges, you can enjoy the benefits of greenery without the need for watering, trimming, or worrying about plant health.
Conclusion:
Installing artificial hedges is a straightforward process that can quickly transform any space into a stunning and low-maintenance vertical garden. By following these step-by-step instructions, you can easily achieve a seamless and visually appealing installation. Whether for outdoor landscaping or indoor decor, artificial hedges provide a versatile and long-lasting solution. Enjoy the beauty and convenience of artificial greenery, adding a touch of nature to your surroundings without the hassle of maintenance.